Showing posts with label WIWOW. Show all posts

Wednesday, August 24, 2011

WIWOW - August 24, 2011


Hi everyone:

Can you believe that it's already August 24? Wow, where has the summer gone? While I always have high expectations of accomplishing many quilting related items - such as actually quilting, the reality is that life often intrudes and sometimes I don't get as much accomplished as I had hoped to. I did get to go on vacation, visit with friends, spend time with my children and organize my quilting studio, so I guess it wasn't such a bad summer after all!

This past week I've been shopping with my children to get new clothes and items for school. I've also been busy cleaning getting ready for a visit from my parents next week. 

In my organizing and cleaning frenzy, I've come across a few projects that weren't quite done. I made some binding strips for several quilts that needed them. They're not actually sewn onto the quilts yet, but hey, you can't do everything at once, can you?
Cute Circus Cat fabric
I also re-discovered a small quilt that I had made using a pattern in Pat Sloan's Favorite Techniques book. The pattern looked fast and easy (it was) and I thought it would be perfect  to showcase some cute fabric that I had in my stash. I quilted it using free form stars and circles, which suited the central fabric. In addition to showcasing the novelty fabric, this pattern would allow me to try a single fold, machine binding technique. The binding is stitched to the back of the quilt on each side one at a time. You then fold it over to the front and machine stitch it down. It sounded pretty straight forward and I wanted to see if this would be quicker than my usual double fold binding technique. 


Of course I also had to add a sleeve to the quilt and this took a little bit of time. 


I also thought that it would be nice to zigzag the binding down, rather than just using a straight stitch. Really, so much more interesting.


I discovered that it really takes a bit more time and effort to use a zigzag stitch for this technique.
Front side of quilt showing zigzag stitches to hold the binding down
I also realized that this technique wasn't quite as quick and easy as I had thought it would be - at least not for me. I think that the stitches were supposed to catch the binding seam on the back of the quilt - mine didn't. Perhaps if I'd chosen the straight stitch instead, that might've been better.
Back side of quilt showing how the zigzag stitches
don't overlap the binding as it should - oops!
Sorry, Pat, but I think I'll be sticking to my double-fold-stitched-on-the-front-folded-to-the-back-and-hand-sewn-down-binding technique. It might take me a bit longer, but I like the finished product better and that's really what it's all about.
Portion of the quilt all done and ready to be hung
Do you ever machine stitch your bindings down or are you a hand-sewn-binding type of quilter?

Monday, August 22, 2011

WIWOW - August 17, 2011

Hi everyone:


Sorry I missed my Wednesday post, but I have a good reason. Really, I do! I was working on a gift for my daughter's birthday. I couldn't show you what I was working on or it would ruin the surprise. Since it was her birthday on Friday (Happy Birthday, Sarah!) and she has received her gift, I can now post it.


Since Sarah is a huge Harry Potter fan, I made her a Harry Potter doll. Here's a quick tutorial on how I did it.


I used the Harry Potter design from her embroidery pattern (you can find it here - FREE!) and increased it to 140% before embroidering it on muslin. 


I then selected some appropriately wizardly fabric for the back of the stuffie and cut out a rectangle approximately 11" x 5".


I created a template for the back of the stuffie by tracing about 1/2" outside the embroidery lines on the embroidery pattern. 


I then traced this back template on medical paper (see through, sort of like onionskin paper - for those of us who are old enough to know what that was). 


I centered this traced template over the wrong side of the embroidered design - it's transparent enough to do this - and then placed the rectangle of back fabric, right side up, underneath it all. The sandwich was: back template, embroidered design, wrong side up and then the backing fabric, right side up.


I stitched on the traced line of the back template, leaving an opening at one side for turning. I used pinking shears to trim about 1/4" away from the seam allowance, ripped off the paper template, turned the stuffie right side out and then stuffed it firmly. When it was plump enough, I hand stitched the opening closed. 


Here's the result!


Sarah was quite pleased with the doll and it was very quick to do. You can see how well Harry fits in with Sarah's other Harry Potter paraphernalia. 


I have also used a similar technique to create my FREE Flourishing Heart pattern
Flourishing Hearts in two colourways
I am also working on a pattern for a family of owl stuffies, which will be published in a few weeks.
Hoot - the dad

Screech, the mom and Whoobie, the baby

Do you like to create stuffies for those special little people in your life - or even for yourself? I'd love to hear about your creations.

Wednesday, August 10, 2011

WIWOW - Aug. 10, 2011

Hi everyone: 


 Yes, it's Wednesday again and I've been working on some new projects, including a new quilt design using the AccuQuilt GO! Tumbler die. I'm also working on something for my daughter's birthday, but that's a secret for now (sorry, Sarah, nice try!).
AccuQuilt GO! 6 1/2" Tumbler die - already used this in another project too
If you haven't noticed, I have a thing for appliqué - specifically fusible web appliqué. My friend, and fellow quilting addict, Cathy Keevill, of Pine Freckle Forest, likes to tease me about this predilection I have for appliqué since I always manage to sneak in some in practically all my projects. 
Appliqué even on my pincushions!
If you follow Cathy's blog, you'll know that she's been working on some quilts that seem to need an extra element to finish them. We discussed one quilt in particular and I suggested that a bit of appliqué might do the trick. I don't think this is really what she wanted to hear, probably because this would mean quite a bit more work, just when Cathy thought she was almost finished this project. But it's undeniable - sometimes a quilt just needs a bit of appliqué - or even worse (in Cathy's opinion), embellishment. 


Which brings me to the project I am currently working on. Fairly straightforward, just alternating patterned and plain tumbler blocks. But they definitely need something. 
These plain blocks are just a little too plain!
What could it be? Appliqué, of course! So, I pulled out some of my other AccuQuilt GO! dies to see what would play nicely together. I thought that flowers would be suitable for the design and fabric I was using in the quilt. The Rose of Sharon (I use this die a lot!) and Feathers dies came to my rescue. First I cut out all of the die shapes on both dies in paper so I could play around with the arrangement on the blocks and this is what I came up with.
This will be appliquéd onto the plain blocks.
See, doesn't that make all the difference? I'm also considering adding a yo-yo or a button (yes, Cathy, these would be dreaded embellishments!) to the centre of the flower, but will decide on this once the top is together. 


Now I have to cut out the appliqué shapes and get this quilt together. That's if one of my other projects isn't calling out to have some appliqué added to it :)


Do you add embellishments to your quilt projects, and if so, what are your favourite ones to use? 


Thursday, August 4, 2011

WIWOW - August 3, 2011

Hi everyone:


Okay, I know it's Thursday, not Wednesday, but due to some technical problems I wasn't able to get this post out yesterday. 


While I had plans to accomplish lots yesterday, I spent most of the afternoon and evening trying to connect a wireless printer to my laptop - without success, I might add. I know you're thinking that this is a fairly simple thing to do - and it is if you are using a Mac and only want to add the printer to the Mac side of things. The complication arises when you're using Parallels to run Windows on your Mac and you're trying to hook up a new Canon copier to the Windows side of things - not quite as easy. Needless to say, hours were sucked up by myself and hubby trying everything we could to get this new printer to work on the Windows side. If you have any suggestions on how to connect a Canon MG5220 wireless printer through Parallels, send me an email. We'll be trying some other ideas perhaps tomorrow once we've calmed down a bit!


I'm still working on the studio clean-up and am almost done. The storage in the sauna is now completely done and full - unless I can find some way to squeeze in a little more fabric (hanging from the rafters maybe?).
Panels, novelty fabrics and collections

More novelty fabrics with cat and dog fabrics to the right

Black and whites and more novelty fabrics (yes, I have lots of these)
I have also sorted and stored my batiks, arranged by colour, as well as my Halloween and Christmas fabrics. 
Part of the batiks sorted by colour


Batiks on the bottom and holiday fabrics,
as well as some landscape fabrics on the top

I'm now working on my "colour wall". I've finished the whites, creams and yellows and hope to finish up the rest of the colours in the next day or so. 


Although this has been a lengthy process, I think it has been worth it. Now all of the various types of fabrics have their own homes and I found some treasures that I had forgotten all about. Rediscovering these fabrics has given me fresh pattern design inspirations. So it was definitely not a waste of time to sort out my fabrics. Now I just have to try to keep them organized this way...


Do you organize the fabrics in your quilt studio, and if so, into what categories? I'd love to hear about your fabric stash:)

Wednesday, July 27, 2011

WIWOW- July 27, 2011

Hi everyone:


Warning: this is a lengthy post!


Well, as I mentioned yesterday, I've just returned from vacation in Montana. I managed to visit 3 quilt shops, thanks to suggestions from Facebook.  Not bad for being away for only 6 days! Of course I did manage to pick up some items - translation - too much! Now I have to find somewhere to house my new purchases. If you read my post yesterday, you know that I'm rearranging the storage in my quilt studio so that it will be better organized and will make it, hopefully, easier for me to find the items I need when I need them.


So, today what I'm working on is storage and organization. I always hesitate to rearrange my studio since I usually know where things are and, even if it isn't the most organized solution, it seems to work for me. Recently, however, I've been reading some organizational books, such as "Unstuff Your Life" by Andrew J. Mellen (thanks to Mark Lipinski's Creative Mojo radio show), where he suggests that everything should have a place and like should be with like. Okay, so I guess storing threads in four different places isn't really the most efficient storage solution.  I'm going to try to follow Mr. Mellen's suggestions - to the best of my ability - and rearrange my studio in the hopes that I won't spend hours looking for that fabric that I know is in here somewhere.


I first purchased some storage towers and plastic boxes from Wal-Mart. I then moved out the boxes and bags of fabric in my sauna/fabric storage room to see what I had - a lot! Once I saw what I actually had, I could make some decisions as to where the fabric should be stored. I also gathered all my thread together to decide where it could be stored more efficiently. I managed to get the thread in one storage tower under my long-arm frame. That was quite easy. The fabric was another matter. 
Thread now in one storage tower - and labelled!


Smaller spools of thread sorted into separate containers by thread type 
I'll admit that I don't fold my fabric so it fits very well in my cupboards (see the photo below). It was getting to the point where I couldn't tell what I had and it wasn't fitting very well in the cupboards. I've decided to start folding my fabric so it's all the same size width and length and this will help me to see what I actually have in my stash. While it may take me awhile to fold my existing stash, I vow to fold all new purchases before they are put away. So far, I have been able to keep this promise. (Guess I didn't buy as much as I thought I had!). It will take me some time to fold my existing stash, but I think I can accomplish this while watching tv at night.
These definitely need tidying up.
Notice the fabric inspector to the right.
These fabrics will be going in the storage towers in the sauna.
I put the two new plastic storage towers in the sauna (an existing smaller tower contains my fat quarters and Christmas fabrics) and put some kits in the bottom two drawers. Daiwabo fabrics are in another drawer and I will be putting my novelty fabrics in the remaining drawers. I'm not sure if I'll have room left for any of my other fabrics, but this will free up some cupboards in my quilting studio area, which will be great. I still have some kits in boxes and plastic storage bins, but these are marked, so that's not a problem. 
Here's what I've accomplished so far. I think things are looking better already and I love how the fabric looks when it is all folded up. It certainly makes it easier to see what I have. 
Before...

And after! Kits are in the 2 drawers to the left and folded fabric is in the middle drawer on the right. Still have to sort out some of the fabric in the bottom right drawer. Lots of room left for novelty fabrics.
There's even visible floor space!


No more thread and lots of room for some notions.
The only problem I still have is with the thread storage. I need a way to keep the large cones upright, rather than rolling around in the drawer. Perhaps one of the thread storage stands with pegs on them that you usually hang on the wall might work in the drawer to keep these cones upright. 

A lot of "drunken" thread cones!

If you have a suggestion as to how I can store my thread cones in this drawer, I would love to hear it - as well as any other storage tips.

Wednesday, July 13, 2011

WIWOW - July 13, 2011

Hi everyone:

Here's what I was working on the past few days. Very preliminary in this photo and you'll have to wait a bit until it's completely together and I've photographed it. Or, if you're in the Calgary area, you'll be able to see this project at Country Creations quilt show this upcoming Saturday from 10:00 until 4:00, where I'll be promoting my upcoming Let's Get GO!-ing class. I'll be teaching this pattern at Bow Bench Retreat this October. I can tell you that it uses GO! dies and is super quick to construct. I'll have more photos of this pattern on future blog posts.


Also this week, in anticipation of the Calgary premiere of Harry Potter and the Deathly Hallows Part 2, my daughter, Sarah, has created an embroidery set consisting of Harry, He Who Must Not Be Named (Voldemort) and her own version of the Deathly Hallows symbol.
Harry Potter - notice the HP props - no
shortage of these in our household!

Not only did she create the designs, but she stitched up the samples too. I must admit that her hand embroidery is better than mine (but don't tell her that!). She was very diligent in finishing the samples so we could get these up for sale. You'll find the set at Chatterbox Quilts should you be a Harry Potter freak fan and embroiderer, such as Sarah. 
How was I involved in this pattern, you ask? Well, who do you think did all the pattern instructions? Sometimes I think it's easier to actually make the projects than to do the computer work, which always seems to take longer than it should. Or maybe I'm just a little slower than I should be at it :)

Off to finish up my sample so it'll be ready for the show on Saturday. If you're there and see me, be sure to say hello.


Thursday, July 7, 2011

WIWOW July 6, 2011


Hi everyone:


Okay, you caught me. I'm actually posting this on Thursday as I was so wrapped up in printing out patterns yesterday to send off to my wholesale distributor, The Pattern Peddlers. I was up late last night to finish them all and wrap up the parcel so I could drop it at the post office this morning. Another thing off my list - check!


I have several more items to complete this week, but I'm starting to see the light at the end of the tunnel. I've been very busy with deadlines these past few weeks and it will be nice when I've actually met them and can then enjoy some of the summer sunshine.

As you know, I have been working with my AccuQuilt GO! cutter these past few months and am still amazed as how many ideas I have for the dies, especially the appliqué ones. I really thought that it would be limiting to use these since they are typically in only one size. I'm delighted to discover that I was wrong. The ideas continue to flow. 

Since I am partial to fusible web appliqué, the GO! dies are perfect for my projects. I just fuse the fusible web to the back of my chosen fabric, pick a die, whip it though and voilà - all ready to become part of a new project. Of course then I have to finish the edges, which takes me a bit longer than the fun cutting and fusing part. In order to hasten the completion of my projects (I'm an impatient gal!), I tend to use a narrow zigzag stitch to finish my appliqué pieces. Most of my projects are wall hangings, so this stitch is sufficient to hold the pieces in place. Below is an example of the look of this type of finish.
Narrow zigzag stitch to finish appliqué pieces
I find this stitch is not as time (and thread) consuming as a satin stitch, however it is not as permanent either. The satin stitch is more elegant in appearance, definitely more visible and is better at holding the appliqués down wash after wash. While I have matched my thread to the appliqué pieces in this project, I sometimes use a contrasting thread for a more fun and relaxed look or to tie various appliqué shapes together.
I used a contrasting thread on the
dog appliqués in Posh Pets
Again, contrasting thread was used on the cat appliqués
to achieve a uniform look to all the appliqués
For more information on appliquéing, I rely on these must-have-in-your-library reference books:

Machine Appliqué for the Terrified Quilter by Sharon PedersonAppliqué: the basics and beyond by Janet Pittman
Mastering Machine Appliqué by Harriet Hargrave (I purchased this when I first started quilting and didn't even know what appliqué really was and am I ever glad I did!)
The Ultimate Appliqué Guidebook by Annie Smith (I just received this book yesterday and it is wonderful and very readable)

as well as I-go-to-these-all-the-time blogs and websites:

Holly Mabutas of Eat Cake Graphics (Cute patterns, great stamps and a wonderful hand appliqué technique)
Kay Mackenzie's blog, All About Appliqué (Kay has wonderful information about appliqué techniques on her blog and in all of her books) 

Obviously, there are many more reference books and websites than I have listed and I find my local library has a good collection for me to browse. 

I'd love to hear about your preferred appliqué technique and what resources you use for reference and learning. 


Wednesday, June 29, 2011

WIWOW June 29, 2011

Hi everyone:


Yikes, it's Wednesday again already. I've had my head down at the sewing machine finishing off a project which I need to ship out this week (sorry, still can't show you what I've actually been working on). It's finally finished and I've learned a thing or two while doing it. 


First, if you're going to do a project with a deadline, keep it small and simple, or what I like to call the KISS principle. As any of my friends will tell you, keeping it simple is not my strong suit! I always have plans larger than my time allows, but that's okay because I definitely work better with deadlines and I haven't missed one yet (at least I don't think I have).


I guess one small owl wouldn't have been enough!
Second, don't plan projects with tight deadlines around the busiest time of the year, which in our household would be either December or June. Now I'll admit that I don't always have control over this, however, I should really learn to say "I'm sorry, that doesn't work for me" a bit more often in December and June.
You need it when?!!


Third, don't think too much about it, just get going on it. I tend to agonize over small details, rather than just moving along. Too much thinking equals nothing completed. Better to complete the project and then think about what you might change next time after it's done, then to miss out on an opportunity.
Should I add a second border? Are these colours exactly right? Just get on with it!


So it's been good to learn a few things from this experience. Now if only I'll remember them when the next opportunity comes along...


Wednesday, June 22, 2011

WIWOW June 22, 2011

Hi everyone:


This week I'm focusing on just getting through all the school events that will be happening! 


Monday was the staff appreciation lunch at our school, which is always a nice event. We all truly do appreciate the effort that the parents put into providing us with a chance to enjoy lunch together and chat. Not to mention the food, which was great!


While Monday was an event for me, the rest of the week is filled with special events for my children. My daughter's grade 9 celebration was over a week ago - but that was just for the kids. Yesterday was her award assembly at school where the parents actually got to attend. It was amazing to see how these kids have matured - and grown! - since grade 7. 
Sarah ready for grad
Today is my son's grad/celebration from grade 6. While he didn't want to get "dressed up", we did manage to agree on a dress shirt and pants. Just couldn't quite justify spending over $200.00 for a suit for a 12 year old! There's a reception after the ceremony, so that will be a great time to catch up with the other parents.


So now the big events are over (aside from Provincial Achievement Tests for my daughter), I can hopefully concentrate on finishing my current project. I will be spending some more time on finishing the edges on the appliqué and tweaking the pattern and will hopefully be able to send it off for photography soon. The fact that we are currently "enjoying" a postal strike certainly doesn't help when you're working on a deadline. I'm keeping my fingers crossed that they settle soon so life, or at least the mail, can get back to normal.


Here's a sneak peek of the background of this project. You'll have to wait a few more months to see this one completely done. 


Hope you enjoyed a wonderful first day of summer!

Wednesday, June 15, 2011

WIWOW June 15, 2011

Hi everyone:


Well, it's been a very busy week for me. I did manage to get the binding stitched on two of my quilts - the Olivia one and a 5 & Dime quilt. Now I actually have to do the hand sewing part. I always think this will take a long time, but really it's only a tv show or two :)
Olivia's My Girl quilt

5 & Dime quilt in Moda fabrics
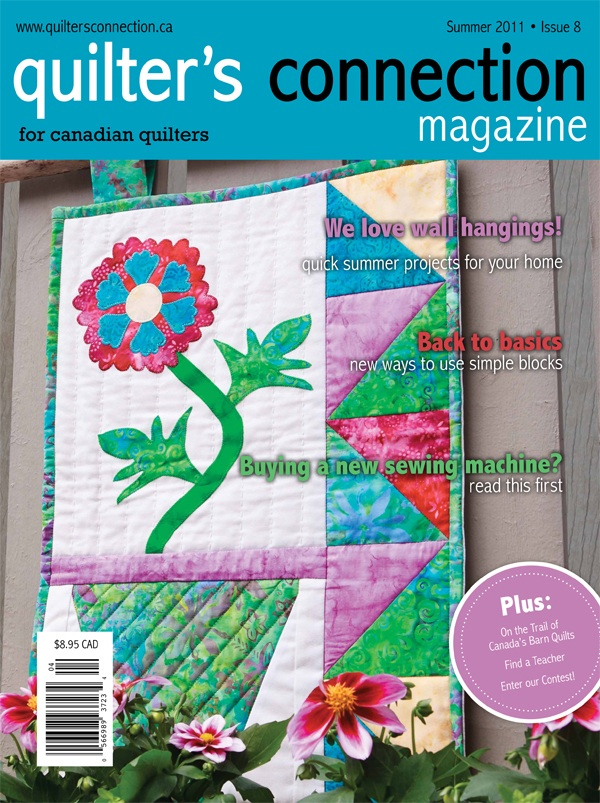
I've been receiving emails from followers letting me know that they've received their Summer 2011 issue of Quilter's Connection Magazine with Blossoming on the cover. I'm so excited to hear their positive comments and so glad that they like my pattern. 


Still riding the excitement of my first magazine cover, I received more positive news. Quilt shops will soon be able to order Chatterbox Quilts' patterns through The Pattern Peddlers. I'm very pleased to be working with them and look forward to a successful relationship.


As if that wasn't enough, I am currently working on a tight deadline to finish a pattern for an international magazine. Can't say too much about this yet, but you'll be the first to know when it's published. Also, you may not hear much from me for the next week or so as I'll be head down in the studio cranking this one out. 


I'm also looking at some local teaching opportunities for the fall. The class is still being finalized, but I'm hoping that it will involve my GO! cutter. I'm often asked about this little baby (well, they have one of those too!) and enjoy using mine so much that I would love to teach others about it. Plans are still in the works, but hopefully I'll be able to tell you about this soon as well.


It seems that it never rains but it pours, but I'll take this kind of rain any day! 


Loving this "job" I have :)